Building off of Japanese folklore, Paths of Perception is an interactive story-telling experience in which the user is both thrust into a wonderland, but challenged to escape, lest they be stuck there forever. Originally intended for Google Cardboard, the experience was designed for Mac and PC
Drawing inspiration from Japanese Kitsune, which are fox spirits that can be both malevolent or benevolent, the user finds themselves in a Shinto shrine/graveyard. The user can see in 360° around where they are standing, but they are not meant to move and explore past their visible boundaries. After observing the peaceful scene— cicadas chirping in the summer, the sun high in the sky— the user is suddenly transported to a more eerie, and otherworldly place. It is still the the shrine, but it now seems ominous and something seems wrong; the sky turns red and the music becomes chilling. This is when 2 Kitsune appear, blocking the only path of the cemetary.
The user is then met with the challenge, find the 3 objects that changed in order to break the evil Kitsune’s — known as nogitsune— curse that he placed on you. The 3 small details in the environment changed from the transition between the day, peaceful scene, to the ominous surreal location, and require a keen eye to identify.
If the user is stuck, the 2 Kitsune offer riddles in order to help identify the objects. But again, one of the Kitsune is trying to trick the user and spouts lies, while the other one is trying to help you escape. It is up to the user to infer and identify which Kitsune is the one trying to help, else, they are stuck in this other world, possessed by the evil Kitsune with no chance to escape.
Process and Implementation
Brainstorming & Implementation
When Mari and I began brainstorming, we were working off of the words “Escape room” and “Wonderland.” We wanted to create the wonder and curiosity that comes within a mystical wonderland, but we knew from the beginning that we wanted to user to only have a limited scope of exploration within the wonderland, lest they become too distracted in the open world and stray from the story we wanted to tell. Within the idea of the escape room, we wanted the user to have some kind of puzzle, or challenge. The wonderland is not merely meant to be gawked at, but to pay close attention to in order to solve a puzzle. We were inspired in part by Alice in Wonderland, specifically when she must drink a potion to fit through a door and search for a key. We thought that was a good execution of Escape Room + Wonderland, as in that scene, Alice has to look for details in her environment to help her solve a problem and escape.
As we were originally building for the Google Cardboard, we designed in mind with the “point and click” interface. This would be the main interaction in furthering the narrative, and so we settled on clicking and selecting objects within the environment we created.
Mari and I are both interested in Japanese folklore, so we began by looking at various Yokai, or Japanese spirits. From there, we found the idea of the Kitsune, and knew that we wanted to incorporate them.
Implementation
Environment
The environment’s design is one of the key components of our project, as the challenge lies within the details of the environment. Originally, we wanted our user to stand in the middle of a path going in 2 directions, with a Kitsune fox on either side. (Shown below)
Our initial storyboard, showing how key this road was in the design originallyWe wanted the area to have lots of details and clutter, such as in this example image.
After user testing, we found that this was not the most effective way to lay out our environment. Users were simply disappointed that they could not further explore down the paths, and felt very limited by not being able to walk around and explore. The layout also had a plethora of objects in it to the point that it was a bit too difficult to see what had changed or not. There were too many gravestones, too many Tori gates (the red gates), too many statues, candles, lanterns, plants, fences etc. It was just too overwhelming in this design.
A lot of the items felt/seemed very far awayToo much clutter also made it hard to pay attention to the different details in the environmentAt first users just arbitrarily started looking at this side of the road
After the user testing, we found that a layout that was more conductive to our idea was to create a closed-off circular layout. In this, there is simply one path for the user to look to, as they are standing in a dead-end. This small area had a limit on how many items we could place around and change, thus accomplishing our goal of not overwhelming the user with the details.
Top view of our new scene design: all the objects are placed in relation to the user’s location in the centerThe foreground and background items are now easily distinguishable
Interaction
Finally finished with our new environment design, we began to focus on the interaction of the project. The original plan was for the user to simply look around and observe their environment before anything changed, and then point and click to select the objects that changed. In order to facilitate animations, we made the user light a candle once they were done selecting their 3 objects that changed. It also allowed for the user to look directly at the foxes after their selection, as the foxes next actions were indicative of whether or not the correct selections had been made.
When they need to select the 3 objects that changed within the environment, once the pointer on the screen lands on it, the object will change color. This was a way to make object selection intuitive for the user, as there were many objects. We also saw it as a way to facilitate the actual selection of the objects, as clicking between 5 objects made it easier than choosing between all of the objects within the environment. We also decided to make one of the objects very obvious (a gray stone fence becoming a bright red) in order to help the user decipher which fox was helping them. Both foxes had riddles appear above them, which hint at which objects changed. But only one of the riddles is completely correct, as one of the foxes is trying to trick the user to select the wrong objects and stay in this alternate world.
If the user selects the apporporiate 3 items, they are then transported back to the normal human world, with the good fox still standing in the path. The words “Welcome Back” great the user.
If the user selects the wrong items, then the evil fox lunges at the user and the screen goes black. This is meant to represent the evil fox finally possessing the user, and the fact that at this point, there is no longer an escape from the surreal reality.
Hovering over an object changed its color, showing it’s selectable Clicking over it changed its hue to blue, indicating it’s selected.
Reflection
Overall, I am very happy with how the project turned out. With some minor tweaking, we should be able to still make it for Google Cardboard. (We really want to show our friends!) While we had some minor issues with the selection color and text not displaying properly/at the right times, we were able to create the detailed, and beautiful environment and interaction that we wanted. Mari and I felt from the very beginning that the scope of our project was realistic, and we accomplished our beginning goals within the project.
For this project, Keyin, Chris, and I decided to go with the Escape Room idea. We had several specific ideas in mind, but we eventually settled on one where the user is wheelchair-bound. The reasoning is that by forcing the player to stay seated while playing/viewing in VR, we can not only easily create immersion, but also counteract any motion sickness felt while moving within the VR world.
In terms of scenario, we eventually settled on using a hospital setting, mainly because we felt it would create a compelling narrative around the wheelchair as well as create a suitable environment for a wheelchair-based user to navigate around in. We also decided to go for more of a “fake-happy”/”light-hearted” low-poly theme rather than an outright horror theme to give our game more of a psychological horror ambience.
My portion of development
https://streamable.com/gs96wb
Extremely barebones first prototype showcasing movement + interaction mechanics using only one button.
https://streamable.com/1ae7el
Collision-based pushing and physics interactions between objects within the world. Wheelchair and player model.POV perspective of player model.
To decide on the theme of the final project, our team, Ganjina, Will, and I, met over zoom. We decided to give more time to brainstorm further individually on the the four final themes chosen in class (Apocalypse, Escape Room, Wonderland, Invisible Cities). We met again couple of days later with our respective ideas. The following ideas were shared and the potential for each were discussed collectively:
APOCALYPSE
User in a normal room, where if they touch anything / try to do anything, it triggers an apocalypse.
Plays with the idea of affordances.
Focuses on micro-narratives.
User in a cylindrical room, with many doors. Opening and entering a room → experience different types of apocalypses.
Can focus on what apocalypse means.
ESCAPE ROOM
User is a kid in a bedroom with monsters.
* Therapist / Escape your mind!
User is a prisoner in some jail (narrative needed).
* Detective has been trapped by criminal mastermind (Joker/Riddler + Batman, Moriarty + Holmes, etc.)
WONDERLAND
User finds themselves on a street / in a room / in a different world where everything seems happy but interaction leads to hallucination that feels disturbing.
Could go Matrix route / revealing the true world underneath
Could go the mushroom forest route / world becomes psychedelic
INVISIBLE CITIES
* City built over a lake → have characters in reflection do different things from characters in view (sort of Hawaii/Bali in terms of style)
* City that colors memory and time travel (Bring back a friend or reversing an apocalypse)
City which only looks down upon the earth → could be sky city with telescopes and things pointed downward, (like Bioshock Infinite but more angelic/futuristic)
City filled with earth → dust everywhere, time slowed down, or literal carvings that come to life as you interact with them.
After much discussion for each idea, we came down to two possible ideas:
Idea 1: City, color, time travel
Initial Idea: A palette, composed of multiple colors, is used as a way to time travel to memories – all of which take place in different cities. Each city has a certain atmosphere, expressed through color in this case, that capture a memory between two individuals. The story is driven by the friendship of two individuals, that which has broken in the present time. The user – one of the two individuals – uses the palette to travel back to these memories and cities, to reverse their past mistakes. The story would have two possible outcomes – one where the user makes the right decisions and wins back the friend and the other where the friendship remains broken.
Idea developed after meeting: The second approach, developed after the meeting, was to base the story on reversing a global apocalypse instead of reversing a relationship. We were more attracted to the idea due to its clear objective, less focus on dialogue and characters – expanding the interaction with the actual environment and setting, hence less limiting.
Idea 2: City built over a lake, reflection [Final Idea]
Inspired by the “Valdrada” (Cavino, 45-56), Will shared his idea on building a city reflected by a lake. Calvino describes it as a city “built. . . on the shores of a lake, with houses all verandas one above the other”. The cities resemble in some aspects but are not equal. Like a mirror, the objects are inverted. Inspiration was drawn from these descriptions. With reflection being the central component, it was essential for the city to be surrounded by water. As such, Will suggested building in a tropical island setting.
Reflected House
Reflected town
Evil vs good
Will’s sketches of reflected tropical island showing two conflicting actions
We decided to go forward with the idea of the reflected city. The idea of reflection had interesting ideas worth expanding on. After deciding on the theme, we decided to brainstorm individually on the story before the next meeting.
Update 2: Story Ideation Part 1 (4/13)
After the meeting, we individually brainstormed the story. Attached are some records:
After individual brainstorming, we met over zoom. We explored deeper into what the reflections would mean in our world. Discussion on the deception of reflections, on the mirror, was discussed. Mirrored images are familiar to the eye, but they are the inverted version of an object. We establish a preference for the familiar. Yet, when we are faced with the ‘true’ images, we feel uncomfortable (ex. un-mirrored images). The idea of discomfort when faced with a truth seemed interesting to expand on. This also relates to how people feel uncomfortable to face the truth, or express themselves in the most honest ways, as it requires vulnerability. Hence, the truth is often masked due to the discomfort that comes with facing such truth.
Another idea that was considered was – what things are reflected and are not? For example, a mirror. When we stare at a mirror, it is only the sight that is reflected – what we see. The four other senses – smell, touch, sound, taste. Also, Colors are the wavelengths reflected by an object. If an object is red, it absorbs every other color but red. So, for something to be reflected, two components – something that is reflected by the object of reflection (mirror, water, etc) and something that is not (which goes through). Leading to the thought – what goes through the reflection and what does not?
With this idea came the thought, what if there was a body of water which refuses to reflect in an entirely honest manner? A reflection which refuses to reflect back the lies and removes any form of deception of the real world? Hence, the reflected city would only show truth.
After the meeting, we had a more clearer sense of what the reflection meant in the world we were trying to construct. But, we were still unclear about the story.
Update 3: Story Ideation Part 2 (4/15)
We looked in to the history of some tropical islands. An example, colonization. The colonizer approaches the town with an intent to take – resources, culture, tradition, etc. However, they conceal their intent through packaging their acts as ‘service’.
Not fully satisfied with the idea, also due to not wanting the story to be too political, we kept on brainstorming the story. While googling images of reflected cities, images of Amsterdam came up. Specifically, Amsterdam’s canal houses.
The setting was capable of encompassing our theme of while introducing new aspects worth exploring and integrating into our story. New topics explored were:
1/ Society
Being a part of society, being truthful is not always an option. One puts on a façade and perform for others. Whether that is stemmed from one’s fear of truth or an act of being considerate other than themselves is highly subjective. Regardless, concealing inner truth to some extent is almost required for a social creature.
2/ Internal vs. External World (The home)
Houses protect people from the external world. Hence, when one is inside a house, their actions become more overt and in sync with their internal thoughts. They become more honest.
3/ Day and Night
From some personal accounts, the time of day seems to change the nature of conversations. Some of the most real talks have taken place during night, when the world has died down and you feel more present with your thoughts.
With these additional aspects came the idea:
Update 4: Paper Prototyping (4/15)
World 1 Street ViewWorld 1 Dock View (Will)World 2 Dock View – Inverted (Will)World 2 Street ViewWorld 2 Window View
[Will’s notes]
During the first play test we were given the following feedback:
How will we guide the user to the pier? Dimming the sky to increase visual salience of the cue may help. Using NPC interactions and dialogue would be even better. Starting the user nearer to the pier might also help.
How are we moving? We could do automatic moving, like in TrailVR, or we could do GoogleMaps style point-and-teleport.
How much animation are we doing? Trying lots of animation means higher potential for making good use of VR storytelling space. It also means more overhead and more work.
Update 5: Environment, UI, Story
To move the project forward, we decided to each take part in the three main components of the development process. Ganjina took charge of starting to construct the environment using the assets (low-poly style) we have decided on, Will took charge of the user interface, and I took charge of the story development.
STORY DEVELOPMENT
Story Summary:
Confined Town
Way in for merchants, no way out for villagers.
Villagers unaware of the outside world.
The Queen and King assign villagers to dig for “stones” (gems) under the town pond in exchange for housing.
Stones used as currency for life-time housing.
Stones are high worth, and sold externally for personal profit of Queen + King.
Main Conflict: Unaware of outside, corruption, topics all of which are not addressed in the main world, only comes out in the reflected world.
Above Reflection (Dialogue directed towards player, but player doesn’t have to reply)
Player: character with no-impact
Aim: player ‘converse’ with each villager, explore their surface-level character
How?: when the player approaches npc close enough and clicks, a set of monologues starts playing on the text box. (each monologue aimed to introduce / build the surface character, all of which will be contradicted in the reflected world with action + dialogues)
Player input: clicking button for next dialogue to appear. After the user walks away, they can come back for another set of dialogues to play for more context.
Under Reflection (Action / Animation + Dialogue between characters)
Player: Ghost with no-impact
Aim: watch npcs interact with each other, watch how their real character shows up through action and words.
How?: User walks to the houses of npcs and clicks for a set of actions / dialogues to start.
Player input: click the house. look around to watch the scene.
The characters pre-existing in the asset is where I drew my main inspiration for the story. The story started with characterizing each npc and through that, I gave a role for each character to construct a larger functioning society.
Record of character development:
female npcs
male npcs
Record of story development:
Attempt 1: Dialogue in World 1 [Failed]
In the first attempt, user was assigned as ghost with no impact in world 1. The user would go around listening to dialogues between NPCs.
This seemed like the wrong approach because it did not give enough room for individual character development. By allowing the interaction to merely eavesdropping on these dialogues, this did not allow the user enough time to get to know the characters. Hence, it seemed essential to clearly set character and they slowly integrate and progress the story. To do so, in the second attempt, I made the user character with no-impact and reshaped the form of interaction into a monologue style – more commonly used in games with NPCs. NPCs would say couple of lines towards the user, but the user does not have choice to respond.
This approach seemed to make more sense. With this set, I started writing the monologues and dialogues which took place in two worlds.
The monologues were organized by character. The order of the interaction did not mater. The dialogues, however, in the reflected scene was organized in a chronological manner and through scenes. The scenes would be highlighted through light and space. A light would turn on where the user has to look. The scenes are organized spatially as seen in image below.
In our first zoom meeting, we chose two prompts; Apocalypse and Invisible Cities. After talking about our idea in class we decided to end up with the idea of using Invisible Cities which considering the situation that we are right now, would be easier to work on in VR.
We decided to create an impression of the city Valdrada from the Invisible Cities by Calvino, where he says: “the traveler…sees two cities: one erect above the lake and the other reflected upside down”. For the environment we decided to make something similar like Amsterdam streets vibe, where houses are just next to each other.
inspirationuser walking to the pier initial view (next to pier)empty city view (next to pier)user walking away from pier user looking at the window (people arguing)
Yeji – started working on the story
I started building the environment based on the ideas we had in mind, though we had to change it a bit since we couldn’t find some assets. As for now I need to add some more decorations and buildings.
Will – started working on building the dialogue system.
For the final project, we decide to establish one of the invisible cities, Octavia and integrate it with another theme apocalypse to convey “storyness”. To begin with, Octavia is a city built on a spider web between two steep mountains. The net is the main support of the city and also the track that traverses the entire city.
When it comes to the structure of the city, paths in the city are made of wooden ties which make people feel shaky and unstable. We would potentially add squeaking sound effects to intensify this feeling.
Although inhabitants of Octavia live in such an environment that seems to be uncertain and frightening for people living “on land”, they are certain about one thing: the fate of the city that it falls when the net is broken, since they know the net will only last so long.
We picture the ending of Octavia in a different way. It turns out that the web is made by a spider a long time ago. One day it comes back and finds out humans have taken over and messed with his web. It is so angry that it climbs over the net and tries to kill all the people there. Inhabitants could only escape from Octavia and run towards the mountain on the other side. Our player is one of the inhabitants and reaches the mountain with all other people. The spider keeps chasing after people and it destroys the buildings and everything in Octavia. The spider is closer and closer to this mountain. To save the inhabitants and kill the spider, the only choice left is to cut the string/rope that connects the net with the mountain. Eventually, the city of Octavia falls together with the spider, disappearing in the abyss below.
Storyline Update:
After presenting our idea of the story, we got the feedback that the incentive of cutting the rope to save Octavia seems unreasonable. Even though we could still do some editions to the story to make more sense of it, we realize our problem that we were focusing too much on the interaction instead of the story itself. Therefore, we make a radical change to our story and try to add some depth to Octavia rather than just its fascinating look. In our new story, the player has the objective of finding his daughter and escaping the city from the only way out. On his way to his daughter, he will see villagers running, crying, or praying, each having some different feelings and faiths.
Scene Building update:
Steven is responsible for the environment construction and destruction animation of houses. I assisted by making modifications to the particle systems of fog and fire, and applying physical properties to the objects on the main path. It is designed that the player couldn’t walk up the small bridges to the “floating islands” along the path. We use the skybox of sunset as the background against the foggy atmosphere around the player.
4.29 Update:
For the movement of player, I’ve experimented with several different ways of walking. The first version that I started with is autowalk, to add to the intense ambiance in the collapsing city, I added some small effects like head and body swaying. However, autowalk makes it hard for the player to stop and observe the surroundings. In addition, the swaying effect doesn’t work well with the GoogleVR SDK and it could be more dizzy for VR players. Therefore, I give up this effect and stick to steady walking. The second version is walking by looking down. This version is simple to implement but when much effort is made on looking down to navigate oneself, the joy of looking around while walking is eliminated.
Therefore, I come to the third version, which is clicking on the path with reticle to walk. Only the walkable surface is interactable and by using NavMesh system, a path is automatically chosen from the current position to the clicked spot. After discussion today, I got the feedback that since there are many houses “floating” above the view of the player, looking down at the road could be a little inconvenient. One suggestion is to have an arrow with a distance to the ground so that the angle change of the player’s view is smaller. I think this is a good idea to experiment with but one of my concerns is whether the appearance of an arrow is consistent with the relatively realistic style of our environment.
Interaction Update:
For the movement of the player, we decide to use clicking on the ground to walk instead of long pressing (with or without arrow navigating). One reason is that there are many blocks on the path like small bricks and wood pieces. NavMesh navigation solves the problem of walking into things blocking the way by generating a path to the selected position. The maximum distance that each movement could reach is increased so that the angle of looking down is smaller. The player could walk a longer distance each clicking and look around more conveniently.
NavMesh over walkable surface is baked in the whole scene
After Vince imported the characters from Fuse to our scene, we worked on looking at the character to trigger its change in posture. The characters each have two animations. When the player walks close to the character and looks at him/her, the character changes to another posture. The transition between animations has to be natural so we choose in the library for the most suitable pairs. In our implementation, the interaction is actually not triggered by gazing at the character since we think it’s hard for the player to figure out how it works without any guidance. It’s triggered by walking to a close distance to the character and the raycast reaching him/her.
The woman in fear when the player is in distance
The woman prays on the knee when the player walks up and looks at her
The idea for our project had evolved a lot before we decided to go with the apocalypse theme. When I was brainstroming for the project, since the main focus of it is to present “story-ness,” I came up with a quite cinematic idea based on the escape room theme (can be found at the bottom of this post in italics). To cover it in a few words, I wanted to play with the concept of escape room and design an environment that is inescapable and thus embodies a mind prison. Both Luize and Nhi liked the idea, but we also agreed that the story would be a hard one to tell, because we would need to come up with a very strong background story for the protagonist so the user could relate to it.
Thus, we changed it into a story that is more easily understandable and relatable, but kept the time travel feature and the circular structure of the storyline.
Reality
The user will first find themselves in an empty room that has nothing but a television (scene 1). Once they interact with the television, they will watch a video clip and then go on an underwater time travelling journey
1st period (1920)
The user will first go to 1920, where there are a lot marine creatures undersea (scene 2)
Something leads them to walk towards a sunken ship (scene 3)
Once they enter, they will find a button (scene 4)
2nd period (2020)
The button takes them to the present, year 2020. They remain at the same location, but the setting has become the interior of a submarine (scene 5)
They are led to walk outside of the submarine, where they will find that the sea has been polluted by human waste, and that the nubmer of marine creatures has decreased (scene 6). Surrounded by plastic garbage, they will find another button
3rd period (2120)
The button takes them to the exact same location a century later, while everything has been much different (scene 7). The scene looks lifeless. All they see are plastic waste and animal skeletons
Finally they are led to a huge pile of gargabe, underneath which they can find the last button (scene 8)
Back to reality
The last button takes them back to the real world (scene 9 a.k.a. scene 1)
The original escape room idea
Protagonist (the user) is a prisoner, wakes up from amnesia, finds themselves in a dark small cell, doesn’t know why they’re there (because the user wouldn’t know the background story of the protagonist either, they would need to explore themselves for the story to unfold gradually)
Finds on a desk some of their personal belongings (e.g. a photograph torn in half, a wallet, etc., something that alludes to their identity, will become clearer later)
A giant clock on the wall of the cell shows red digits and counts down from 1 hour (brings anxiety)
Thus starts looking for tools and tries jailbreak
Somehow (needs further discussion on how exactly) finds a secret door behind the bed to a very very long dark corridor and walks into it
While walking, finds the corridor getting brighter and brighter, surroundings changing into a few different scenes over time (e.g. a park scene where they used to date their boyfriend/girlfriend, a classroom scene, a childhood bedroom scene, etc.)
Sees a screen on the wall of corridor every once in a while, thus stops to see what it is, finds that it plays a video clip (where a part of the protagonist’s story is told)
For the video clips I don’t have anything specific in mind yet, but generally they should be something joyful that contrasts the reality that the protagonist is in
It could be some image that matches the aforementioned torn-up photos, so that the user realizes that the video is from the protagonist’s memories
The main idea here is, the farther they walk into the corridor, the more they go back into the protagonist’s memories, so it would be like walking through a time travelling tunnel and going back in time
After walking past a few different scenes (like three or four? Each having a short video clip), the user will have had a basic understanding of the story
The protagonist comes to a final scene that represents their childhood (meaning the time travel is about to end at the very start of their life)
Sees a door at the end of corridor
Opens the door and finds that it leads to the cell at the beginning
Eventually realizes they are actually trapped in their own mind because they are stuck in memories from the past
Two alternative endings:
Happy ending – suddenly wakes up and realizes it has been a dream, finds that everything (family, boy/girlfriend, friends, pet dog) is still there (main message: cherish what you have right now (?) )
Bad ending (but more interesting in my opinion) – finds a note on the desk that puts the story together, revealing that the protagonist used to live a good life, but they destroyed it bit by bit. The clock on the wall finally counts down to 0 but, to their surprise, restarts at 1 hour (meaning that this is an infinite loop)
Nhi and I worked on the first scene together. Inspired by a scene in The Matrix (1999), this white room will serve as the starting point of the experience.
4/21 UPDATE
Considering the switch of platform from Google Cardboard to PC/Mac, we decided to further simplify our project to two scenes, where there would be no more sunken ship or submarine. Instead, the user will first find themselves inside a white room, from which they can go to the underwater scene through watching a video clip of the project overview. I built the room scene (shown below) going for a bright, casual, everyday atmosphere, so that the user would feel familiar upon entering the environment.
4/26 UPDATE
The building of the underwater scene was started by Luize, and I touched it up a little bit after that. We tried to make the environment feel fantastical and wonderland-ish by using the jade-colored water asset and adding a lot of marine creatures.
4/27 UPDATE
Luize edited a video to play on the television in the room scene, which talks briefly about the impact that man-made plastic waste has on the ocean and serves as an introduction to the background and reasoning behind this project.
5.10 UPDATE
I made some more changes to the underwater scene. I added a path for the user to walk along, and laid out more plants and corals.
5/12 UPDATE
I added the plastic spawning effect to the character.
When we first met up to brainstorm our idea, we discussed themes such as recreating a city from Invisible Cities or creating a version of an Escape Room. Our first idea was to represent each of the cities that we chose for the Spring Break blog entry into different scenes in our world. The player would then be able to travel through these cities and learn about each of them based on their inhabitants and environment. As much as we liked the visuals of such idea, however, we were worried that this theme would not portray much of a story. Therefore, we moved on to brainstorming new ideas and considered the Escape room theme where the protagonist would wake up from amnesia and finds themselves in a prison cell where a clock would be ticking and they would have to find a way out of the prison. However, we were worried that by choosing this approach it would be difficult to convey the story to the player in a relatable way.
*
After more brainstorming, we settled on the Apocalypse theme. Our take on Apocalypse in this project is a representation of how both conscious and unconscious actions and habits of human beings lead to ocean pollution. When creating the initial storyboards, we laid out 9 scenes. The first and the last scene is the same – the player finds themselves in a room with a television. After interacting with the television, a video would play and they would become familiar with the theme and learn some information about plastic pollution in the ocean. Then they would enter an underwater world where they would go through different scenes all in different times. The user would follow a path on the ground that guides them through different scenes and to switch to a new scene the user would have to press a button or interact with an object in the ocean. Starting in the year 1920 the ocean would be clean and a lot of sea creatures would be swimming around. Moving on to years 2020 and lastly 2120 the ocean would become more and more polluted with plastic and there would fewer sea creatures around them and they would realize that the underwater world cannot be saved anymore. The user then goes back to scene one where actions can be taken to do something to save the environment. Here are the storyboards of our project.
*
27/04 Update:
Since the last Development Journal entry, we have modified our project after the update that we wouldn’t be able to use the Google Cardboard, as we do not have Android Phones. However, we will still create the project as if it would be built for Google Cardboard, therefore using a reticle. After the first playtesting session where we shared our storyboards, the feedback we received very helpful and valuable feedback. Here are some of the storyboards we showed to the class.
*
Based on the feedback we decided to significantly reduce the number of scenes. We also decided that there will be lass interactions, as there was no more need to switch between many scenes. However, the transition between the remaining scenes becomes more integrated into the story and seems a lot more seamless instead of just pressing a button. The remaining scenes will be the room with a television and an underwater ocean world. We decided that after watching a video about pollution and how it has affected our oceans on the television screen in the first scene, a nautilus painting would light up next to the television which would indicate that the user needs to press on it. After pressing on the painting, the player would teleport to the next scene which is the underwater ocean world. In the underwater world, the user will walk alongside a path on the ocean bed and after them there will be a trail of plastic waste left behind. The trail of plastics represents that despite being environmentally conscious and practicing eco-friendly measures, it is almost inevitable to produce no waste and that our actions have an effect on the ocean’s purity over time.
*
In terms of working on the scenes Nhi and Tiger worked on the room with the television and the initial set up of the game when the user enters the world. We have also decided on adding plastic containers in the first scene that the user would be able to interact with – pick up and drop them. Therefore, when the plastic containers start appearing in the following scene, the user would make the connection that their actions may have impacted the fact that the plastic appeared in the ocean. I worked on designing the underwater ocean scene and editing the video which will be played on the television in the beginning. It gives an overview of general facts about the ocean and then about how oceans have been affected by plastic pollution. For the underwater scene I am using a set of great assets that I managed to find when creating the budget for asset purchase. One of the assets contains an underwater background with bubbles and jellyfish that are animated and give a realistic feel to the environment. Besides that, the rest of the ocean is a combination of different rocks, corals, seaweed and sea creatures.
a still from the video about plastic pollution in oceans
*
05/05 Update:
After doing the first playtesting session with our classmates, a recurring response that we received was about the interaction with the plastics in the first scene. The user is able to pick them up and “drop” it, however, it goes back to the same location, as it was picked up from. Also, the movement after picking up a plastic container is only possible vertically, thus feeling less natural. We will work on being able to move around the object both horizontally and vertically and drop it properly using physics on the object. Instead of the user teleporting to the next scene through the painting, we also changed it to a coral that is located closer to the television, thus being more obvious that this is the object that needs to be clicked. Also, the light in the room goes dark after the video finishes playing, thus there is more emphasis on the coral that is now lit up. From playtesting we realized that sometimes players were confused, as to where to click after the video stops playing. I will also shorten the video, as it seemed too long. In the underwater world, the scene was also updated and a path using seaweed was added that would guide the user, in order for the user to not wander off too far in the ocean. Now we still need to work on improving the interactions, improving the ocean scene even more, and adding plastic in the ocean over time.
*
09/05 Update:
The interactions with the objects in the first scene have significantly changed, as it is now possible to pick up objects and drop them around the room. This provides a lot more interactivity and the user is more stimulated to pick the plastic containers up and drop them. I am currently working on making the fish and other sea creatures more in the underwater scene. All though I have managed to make the fish move in a straight line, I am still struggling with adding rotation by 180 degrees over time, in order for the fish movement to seem more natural.
*
12/05 Update:
I finished the script for moving the fish and rotating them after some elapsed time. Tiger has been working on the transformation of the ocean – after the user walking through it for a while, the ocean becomes darker, sea creatures start to disappear, and instead plastic containers from the first scene start floating around. Lastly, I also finished shortening the video for the first scene.
In this final project, Mari and I wanted to work with the themes of wonderland and escape room. Wonderland is defined as:
but we only wanted to work loosely off of this definition, as we knew we wanted some kind of “darker” side to the wonderland. Within our brainstorming for the wonderland setting, we looked at Alice in wonderland’s infamous door know scene found here:
We looked at this scene in particular due to the fact that Alice is indeed in a wonderland, but faces troubles and fears within it due to a fear of the unknown. In this example of a wonderland, there isn’t something inherently bad, but the main character is frightened in the uncertainty that shrouds the strange place. We knew we really wanted to try our best to incorporate this into our assignment; the idea that a wonderland inherently carries a sense of the unknown which can make it frightening, although the wonderland may not have any conventionally frightening things.
Within the idea of causing anxiety to our user within the environment, we briefly looked into the SAW horror films as an example of a (literal) escape room type situation.
An image from the Official Saw Escape room found in Las Vegas (site found here: https://sawescaperoom.com/)
This was quickly dropped, as we decided we wanted our wonderland to follow more of a “fear of the unknown” rather than a blatant horror style.
An escape room, according to wikipedia, is defined as the following:
Again we wanted to loosely interpret this, and so our idea of an escape room is meant to represent the goal of the user to look for a kind of relief within the wonderland. This fit in nicely with our idea of the fear of the unknown, as so we had a general basis to work with from there.
Concretization of the Idea
At this point we knew what we generally wanted, and so we had to pick a concrete idea to work with within our wonderland environment. We liked the idea of creating something from folklore, and after some discussion settled on Shintō Folklore from Japan. Specifically within Shintō folklore, we looked at the Yōkai. We liked the idea of focusing on Yōkai, due to the fact that they are not necessarily associated with “good or bad” and playing with the gray area they fall into.
A brief definition of Yōkai from Wikipedia
Narrowing it down further, we really liked the myths of the Kitsune. This is a type of fox yōkai, or spirit, that has various abilities such as being able to can shape-shift into a human. According to Shintō folklore, the Kitsune have multiple tails and can reach up to 9 tails. The tails represent their age, power, and intelligence, so a Kitsune with 9 tails carries the implication of being of the highest caliber in these regards, and is a very rare sight.
There are also various types of Kitsune. The two that are key figures in our game are the following:
Nogitsune: Nogitsune are wild foxes that do not serve as messengers for the gods. They are known to torment, trick, and even possess humans, sometimes using their shape-shifting powers to do so.
Zenko: Also known as benevolent foxes, the zenko are mostly associated with the deity of rice, Inari. These kitsune are white in color and are also known to be able to ward off evil, also at times serving as guardian spirits. They also help protect humans against nogitsune.
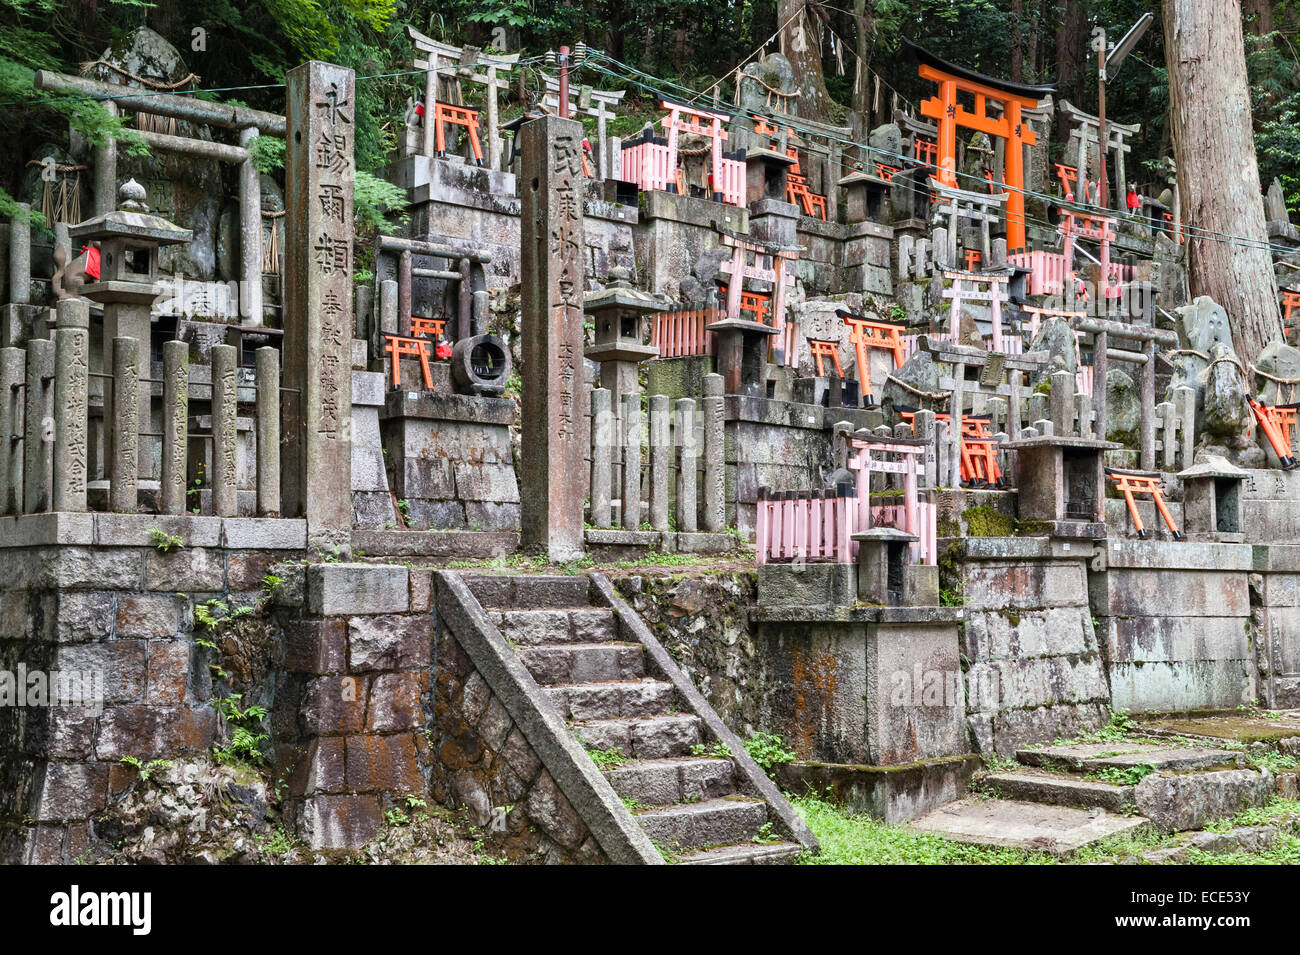
In Japan, there are many Kitsune statues found within Shintō shrines. Therefore, we decided to use a Shintō shrine as our setting for the project.
Fushimi Inari Taisha Shrine in Kyoto
Along with making the environment be a shrine, we were also influenced aesthetically by the Nintendo game Muramasa Demon Blade . The game is 2D, but we really liked some of the visual cues used in the game in order to articulate more specifics in the setting.
An example of visual cues: the shadows of the pagodas in the background help add another layer to the scene, as it is not just a forest the main character is running through, but a dense forest right next to people. As you continue moving as this character, the pagodas in the background become less, showing that you are progressing away from civilization.A Shintō shrine (shrines can be cemeteries as well.) A great visual cue here is the green, frightening hue that environment takes on in order to create a sense of otherworldliness.
Storyline so far . . .
And so finally for our story, we decided that we would like it to be based off of the zenko and the nogitsune foxes. The current layout of the narrative would be as follows.
The user finds themselves alone in the middle of a shrine/cemetery during sunset
As the sun sets, the environment starts looking more hostile/surreal (haze, colored skybox, creepy background sound, based off of some of the aesthetics shown above in Muramasa Demon Blade)
Once the environment is fully “surreal”, two foxes appear in front of the user. Both have 9 tails and look similar. (one is an Inari fox, the other is a wild fox that has disguised its appearance)
The user is prompted to “make a choice” and pick one of the two foxes.
If the user chooses the Inari fox, or the “good” fox, the environment goes back to how it normally was (we are still considering different options on how to make this outcome more interesting/exciting)
If the user chooses the wild (bad) fox (which is disguised as a good Kitsune), they stay trapped in the surreal space.
Finally, a helpful summary of some of the feedback we heard in class:
Ending: does it end due to a user’s option? Or just naturally? Or does the user just take the Google Cardboard off ?
How do we hint at the choice that the user has to make? → we could possibly have the kitsunes be on different path and then the user chooses between them → does this mean that they move somewhere else after following the path? The user appears in another part of the shrine?
How do we create a satisfying ending for the good fox? (right now the “bad ending” seems more interesting)
After a bit of brainstorming, Ganjina, Yeji, and I narrowed our ideas down to two, one idea that intersected apocalypse and Invisible Cities and the other based upon an invisible city. After receiving feedback on our ideas, we decided upon the latter, an experience expanding upon the city of “Valdrada” (Calvino 45-56). Practical limitations of the interactions in Google Cardboard make the former idea much less compelling.
Yeji’s brainstorm of the first idea
group brainstorm
short list of ideas to pursue
According to Calvino, this city was “built. . . on the shores of a lake, with houses all verandas one above the other,” such that “the traveler . . . sees two cities: one erect above the lake, and the other reflected, upside down” (Calvino 45). Calvino goes on to describe it as “twin cities” that “are not equal,” for “every face and gesture is answered, from the mirror, by a face and gesture inverted, point by point” (45-46). In this way, they “live for each other . . . but there is no love between them” (46).
From these descriptions, we began to think about different stories that were emerge from, and environments which would embody, such a city. For the environment, we are currently leaning toward a tropical island style, though this may change as we work out the story more thoroughly. Furthermore, we may adopt a similar visual style to Kentucky Route Zero. The next step is to flush out the story in its entirety.
pen sketch of environment
pen sketch of environment
So far, we’ve established that the city contains two cities which have been affected by a large scale traumatic event. In the non-reflection city, the characters respond to the stress of such an event in ways which are ultimately positive, whereas in the world below, their responses reveal the darker aspects of humanity. In some way, these two worlds will interact visually, and perhaps causally.
reflected office building – illustrating alternative aesthetic
reflected children “playing”
As for the specific stories to which users will bear witness, I’ve so far thought of watching the relationship of two people. In the non-reflection city, users watch key moments of their lives which bring them to be the closest of friends, and in the reflection city, users watch them become enemies who kill eventually kill each other. The user might be able to influence the story by choosing which world is the physical one and which is the reflection.
28/4
Much has changed in the last two weeks. To start, our environment and story have shifted significantly. Shortly after finishing the last post, Yeji suggested a compelling environment inspired by Amsterdam, coupled with a story that revolves around the user exploring the meaning of reflection. We decided to develop and begin building that idea.
Pre-development Story Description
Yeji’s illustrations of the idea
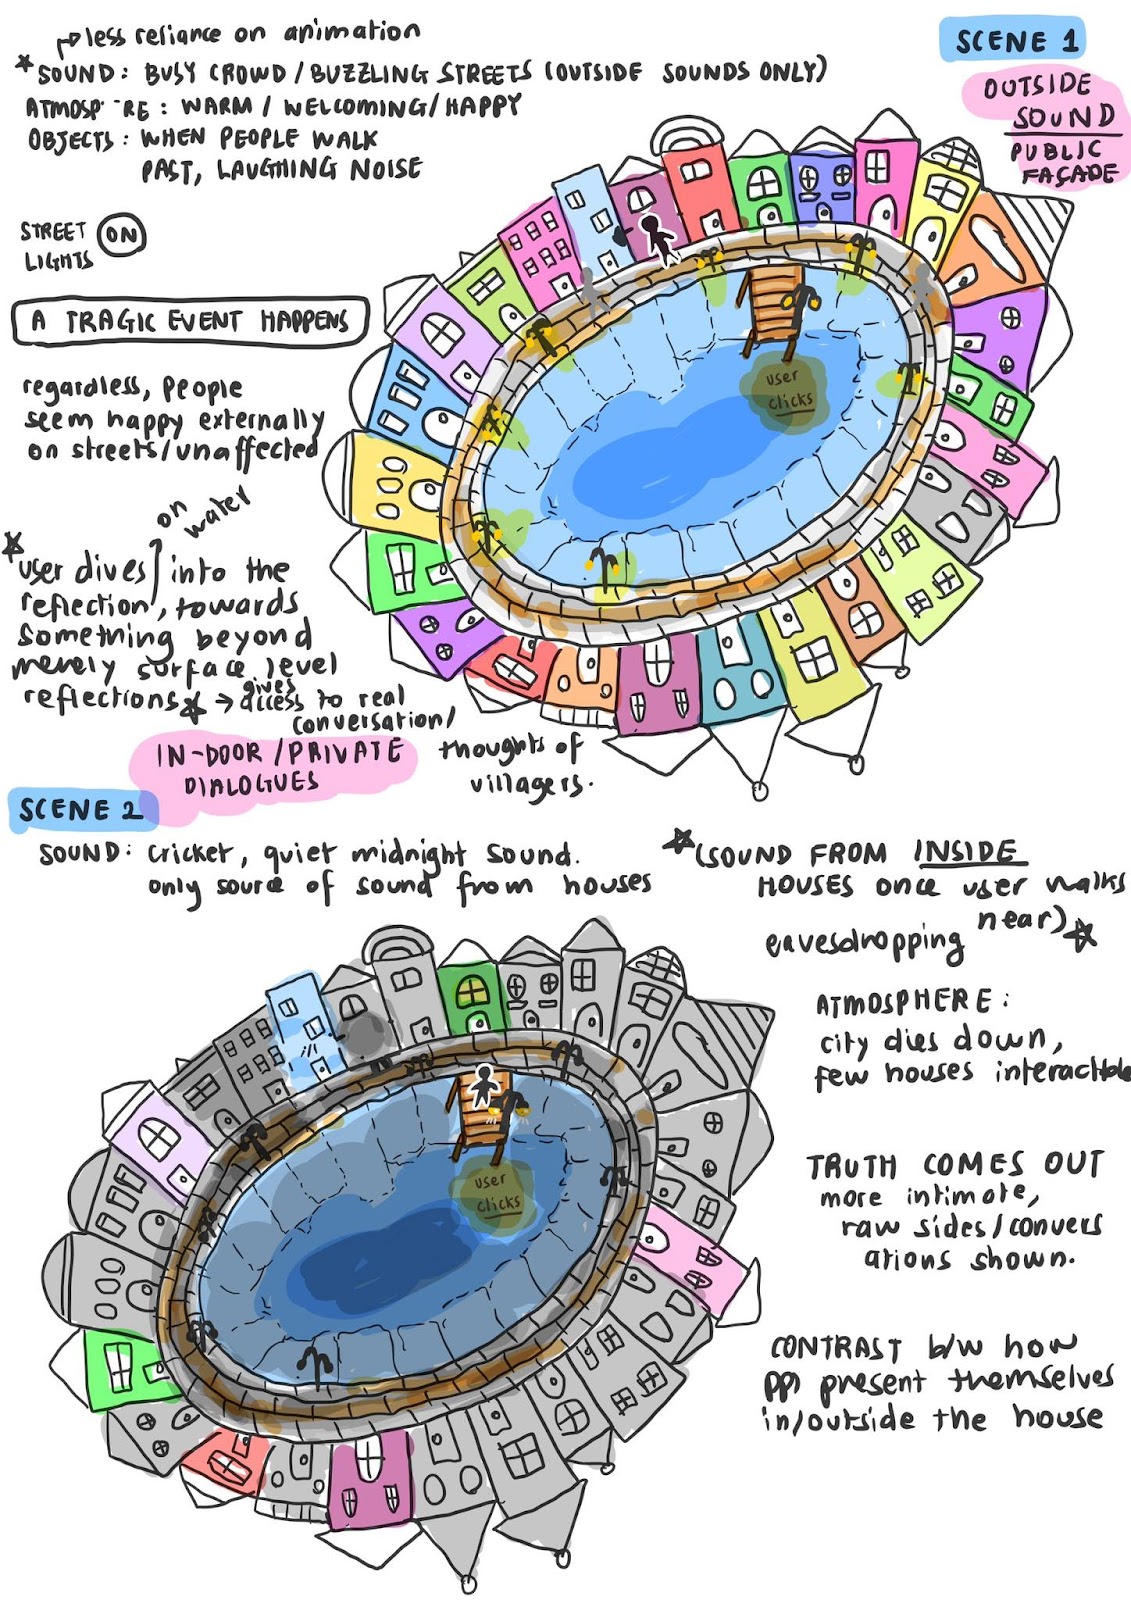
There will be two cities, one we’ve been calling the “initial” city and the other we’ve been calling the “reflection” city. The user starts in the initial city, the houses are colorful and the sky is beautiful as the street lights start to come on and light up the city. People are walking around, and the atmosphere is cheerful. A pier stretches out onto the lake. The user can walk around the lake and talk with the NPCs wandering about their daily lives. Over time, a light will appear in the water at the end of the pier, drawing the user to it. When the user reaches the light, they find they can click on it, and suddenly the world shifts.
The user finds themselves in a city that is the reflection of the initial city. The building positions are flipped. The sky is dark. The houses are grey. No one is outside. A few houses have color, and a similar visual cue to the water, suggesting the user may interact with them. As the user approaches the homes, they can peer into the window to see an interaction reflecting a major event which has negatively affected the residents, something which those in the initial city spend their lives ignoring.
Development So-Far
Paper Prototyping
After establishing a general outline of the experience, we sketched paper prototypes for the play-testing session.
user in initial city (Yeji)
user on pier in initial city (Will)
user on pier in reflection city (Will)
user in reflection city (Yeji)
user peers in window (Yeji)
We received several major feedback points:
How will we guide the user to the pier? Dimming the sky to increase visual salience of the cue may help. Using NPC interactions and dialogue would be even better. Starting the user nearer to the pier might also help.
How are we moving? We could do automatic moving, like in TrailVR, or we could do GoogleMaps style point-and-teleport.
How much animation are we doing? Trying lots of animation means higher potential for making good use of VR storytelling space. It also means more overhead and more work.
Once we received feedback on our paper prototypes, we decided to pull assets before dividing up the work of building and finalizing the story.
Story
We shared a few ideas at the end of a meeting, and then Yeji took the lead on the story until we could meet again to finalize it. As of now, it is still being flushed out. The “big event” idea mentioned earlier has been located in the idea of fear of the unknown outside world. The city, as depicted, will be entirely enclosed around the lake. The reason for this peculiar design will likely guide the tension of the story. The story is also emerging from an asset pack of fantasy characters that we picked up.
Environment
Ganjina started building the environment based on the drawings, and a few thing have changed as a result of the assets we are using. First, the “lake” is square. Second, the pier is a bridge, though this may change. Otherwise, as of now the first draft of the initial city is done.
Dialogue System
For the dialogue, we considered doing voice overs but ultimately thought that doing a text-based system would be more interesting to try and be much more scalable. I was given the task of starting to build the dialogue system.
The first step was to build a panel for all of the UI to go on. I knew that I wanted to build a panel based on the optimal ergonomic VR workspace areas defined by Mike Alger in 2015. For that, I would need a structural framework which could take real-world inputs. Unfortunately, my skills with Unity are not such that I could satisfy my own need for accuracy. Luckily, I’ve been working in Fusion 360 a ton for Machine Lab, and I was able to build my own panel.
There are two versions. The first is a spherically-curved panel. I estimated 2/3 arm reach distance as 2/3 of the FOV of Google Cardboard, roughly 60 degrees. I then took the 15 to 50 degrees below eye level, and intersected the sketches with a body.
spherical, curve panel
However, after I implemented this, I realized that the asset pack I was using, Easy Curved UI Menu for VR, could only curve around a cylinder, that is, around one axis. Matching that up against the optimal spherical curvature was sub-par, so I built another one that only curved around one axis.
cylindrical, curve panel
After working with the Easy asset, I realized it would never do what I wanted. I could not get the curved menu to rotate at 32.5 degrees (the mid-curve of the optimal angles). The asset pack essentially takes a flat panel, cuts it up into a bunch of rectangles and looks at them through a rendering camera, generating a curved plane in the process. Unfortunately, every time the curved menu generates on play, it resets its rotation.
easy UI refusing to rotate to match the frame
I did some research and found a method with UI Extensions. That worked great. I matched up the bezier curves, and moved on.
fitting the UI panel with the model panel
From there I focused on making the panel translucent when no dialogue was present. To do this, I had to drop the background image and kept the 3D model I had made in the environment instead. I also kept receiving no errors and no functionality whenever I implemented the GoogleVR reticle system, so I built a reticle and raycasting scripts based on class examples. By the writing of this post, this is where I am at in the overall system:
The panel is translucent when not in use, but present so it does not jar the user when it appears. The reticle changes colors when it hovers over an object makred “NPC,” and clicking on an NPC changes the panel to more opaque and brings about the dialogue related to that NPC. When the user looks clicks away from the NPC and clicks, the dialogue disappears, and the panel becomes more translucent again.
Dialogue System To-do
script user’s ability to scroll through several panels of dialogue
test with multiple dialogues
test with multiple NPCs
script automatic movement
script movement restriction upon dialogue initiation
script movement freeing upon dialogue ending
bring it into the larger build
12/5
The Play Tests
Shortly after my last post, Yeji had extensive dialogue written, and we all met to finalize the story. Ganjina continued to push through on the environment, finishing up both the initial and reflection cities. With the dialogue system I created a series of demos.
The first demo was not much more than the system, a way of explaining how it worked to the user for feedback during our very first play testing system.
We received feedback to change the reticle so it was more noticeable, to speed up the walk speed, and to decrease or eliminate the delay between clicking and the starting of walking. During the play test, we also explored how to drive our story forward, several ways were proposed. We could used the dialogue by restricting or obscuring actions until the player made progress. We could also use the time of day to push the user to move on from the daylight scene.
Using this feedback, as well as dialogue developed my Yeji, I built a second tutorial which demoed the way we decided to organize the characters and interactions in order to drive the story forward. At this point, Yeji jumped on working on animating the characters while Ganjina put the finishing touches on the environment.
Using real characters and real dialogue created some design problems. While there were many small ones, one of the larger ones was how to trigger the indicator that the NPC could be interacted with on the front and back end. Using the GVR reticle pointer system, I set the distance to 2.5. I then set up a collision detection system with spheres around each NPC. Done, right? No. The player would have to scroll through the dialogue when inside the sphere collider by clicking on the dialogue panel. However, because they were still inside the sphere, the raycast would detect a hit on the NPC, not the dialogue panel.
pseudo-cylinder colliders below dialogue panel but tall enough to detect player
I put the sphere colliders on children of the NPC game object and set those children to the layer “Ignore Raycast.” Nope, same problem, most likely because the box collider on the body still had to be clickable to activate the NPC interaction, so I could not put it to “Ignore Raycast.” My final solution was a compound collider made up of four box colliders set at 0, 22.5, 45, and 67.5 rotations of the y-axis around each character. The created a pseudo-cylinder that rose high enough to detect the player controller entering them but low enough that they would not encounter the dialogue panel. This worked fairly well, but I did not figure out that “Ignore Racast” existed until after the second demo was ready, so the dialogue panel was very buggy in this demo. Similar problems with the scene-switch button meant play testers had to run through multiple times to encounter all the NPCs.
An additional problems at this time was a lack of order in the night scene. Users could just go up to anyone. The GVR reticle was also not accurately indicating when the user could activate a component.
Because of these problems, we received limited feedback. There needed to be an indicator that there was more dialogue when there was more dialogue and not more dialogue when there was not. For this, I added next and stop buttons to appear at the appropriate moments on the panel (see video at end) One play tester also suggested bringing the dialogue box up and to the side rather than down low. However, the positioning of the panel should be based on experience in VR rather than on a computer. While a panel low might be annoying on a computer, looking down at something in your hands or near chest height to read information about something in front of you is a fairly common interaction. It was something I decided to try at the end if we had time, and we did not. One piece of feedback that was implemented after this session was the change from a panel that switches between opaque and translucent and one that switches between active and inactive, minimizing its on-screen time.
Final Development Stages
At this point, Ganjina had finished the environment and started finding sound files and testing ways to switch from one scene to the next. Yeji would orient the characters in the completed environment and determine their interactions. These scenes would be sent to me, and I would integrate the dialogue system into the animations. This was the most difficult part. On the back end, my limited experience with C# made ensuring that everything would trigger exactly how we wanted, when we wanted, difficult.
I could write a small book on all the little things that went wrong during this. What was probably the driver of many of them was the fact that the two scenes had reflected some things and not others, and one of those things was the user’s agency. In one, the user commands the NPCs; they attend to the user upon the user’s request and guide the user to where they want to go. In the other, the user witnesses the NPCs: they ignore the user and let the system explain where they have to go.
I did the second, darker scene, which we started calling “night scene,” first. In this one, every scene’s dialogue had to be broken up, with individual pages triggering and being triggered by different animations and sounds. Also, it took a while to figure out that if I wanted the user to adhere to a certain order with a plague of nullreferences, all I had to do was avoid using else statements. I also became fluent in accessing and assigning variables inside of animators. A good example of this is the “deathTrigger” script, which checks if another specific NPC’s animator is running its “attack” animation, and, if so, triggers the boolean “attacked” in the animator of the NPC it is attacked to, leading to whatever animations result.
animator with attack animation, checked by death trigger
death trigger script
I also put together the lighting system for this scene, which indicates to the user which characters to approach and interact with. Some of the lighting cues are based on dialogue, other lighting cues are also based on animations ending, as needed.
all the spotlights turned on
After that, I did the first, brighter scene, which we started calling “day scene.” Having characters face the user was easy. Having NPCs walk along a certain path continuously, face the user when the user clicked on them, and then return to walking that path when the user did not click on them, that was a bit harder. I figured it out though, writing some pieces of script in the dialogue manager that stored the rotation of the NPC on Start() and then returned the NPC to it when the user clicked on the final page of the dialogue for that interaction. It would also happen when the user left the detection colliders of that NPC. Animation start and stops were also made to correspond. I created separate idle states with trigger transitions that would be triggered by the dialogue manager, or another script if necessary, when the user clicked on the NPC. Hence, when a user clicks, the NPC would stop moving, look at the player, and do an idle animation. When the user clicks all the way through the dialogue or walks away, the NPC returns to its original orientation and starts walking, or simply continues to stand or sit.
animator for pacing, user clicking triggered transition to wave
Once I had these scenes done, I wold send them to Yeji, who added the final sound pieces, and then we worked on developing an aesthetic trigger for switching scenes that functioned the way we wanted it to. The trigger only appears in the first scene after the user speaks to the king. Dialogue guides them to the king, though they can choose to speak to him first if they wish. The trigger only appears in the second scene after the sixth mini-scene has completed, ensuring that the user stays in the night scene until all six mini-scenes are witnessed.
scene transition orb
Generally, I learned many lessons about C# and about the power of scripting in Unity. It is frustrating that the end product is not perfect. NPCs do not always turn properly when clicked on. Sometimes the dialogue panel refuses to appear. When we demoed it for the class, we found a hole in the colliders that we had never encountered before. However, I think the experience can go one of two ways. The user can skip through the dialogue as fast as possible, hit the big shiny orbs and then fumble for the escape key or alt-f4 to quit. Or, the user can slow down, pay attention to the characters and read the dialogue and come to understand an interesting story about what is reflected in the mirrors of the people we encounter everyday, and what we all pretend to forget. Given the timezone differences between our group and our relatively amateur skill sets, I think we did fairly well. So, without further adieu, here’s a run through
For the final project, Ellen, Steven, and me decided to create an impression of the city Octavia (in the Invisible Cities by Italo Calvino) as a backdrop for a mother’s journey to find her daughter in the midst of the city falling.
The city of Octavia struck us as being precarious, with its foundation being held by spider-web structures made of ropes and ladders across a deep valley sandwiched between two tall mountain peeks. It was believed that the fate of the city was certain: one day, the ropes would snap and the city would fall, bringing with it the people of Octavia.
Illustrations of the city of Octavia. These serve as a nice departing point for us to construct the city in a 3D environment.
Initially, we envisioned the city to be destroyed by a monster spider that laid the spider-web foundation of the city in the first place (on which houses were built upon by Octavians). The spider came back to its spider web only to find out that it was already stolen by humans; thus, it was convinced to take vengeance and destroy the city. The main character now has to save the city.
However, after sharing the idea with everyone and received mixed feedback on the incentive of the main character (whose motive was not clearly defined as to whether to save the city or to save the people), we decided to ditch that spider idea altogether.
Initial rough sketch
Instead, the story now involves a mother and her journey to find her daughter in a chaotic, gradually disintegrating city and get to the mountain before the entire city collapses.
A big part of the experience will revolve around the environmental storytelling. Along the way of finding her daughter, the mother will witness parts of the city (ladders, debris…) slowly fall down into the abyss while people frantically try to escape. Some people cry. Some people yell for help. We hope to be able to capture the essence of the city and its people in its demise.
We have yet to decide whether the mother’s journey should be simple (along a linear path that has been predetermined and events can be thus linearly triggered) or more complex (that allows more degrees of freedom). We have to take into account the limiting factor of the Google Cardboard when devising the storyline of the experience. Also, we should think about whether or not to keep a time limit (which will also dictate that there are two outcomes: the mother find her daughter just in time and make it alive, or she fails and falls with the city), or not (which implies that the user can take as much time as possible to accomplish the task, which then begs the question of what keeps the user incentivized to proceed through the experience with the kind of emotion and pressure that a mother in that situation would feel).
[Updated] April 22, 2020
After many discussions and feedback, we decided that the mother’s/father’s journey to find his/her daughter in the falling city of Octavia to be quite linear.
The 360 revised sketch of the scene. It can be seen that there is one main long stretch of pathway across the city, connecting the two mountains together. From there, houses on smaller platforms branch out. The main pathway will be the only navigable space within the scene, which considerably helps simplify the experience.
[Updated] April 29, 2020
I took on the role of creating the Non-Playable Characters (NPCs) that would help to further depict the demise of the city by incorporating human elements to the environmental storytelling of the experience.
As we picked the Medieval Unity package for the houses and animate objects, it is clear that the characters should have the same aesthetics.
The scene’s Medieval aesthetics
The majority of Medieval characters we found are either too expensive or too few to work with; therefore, I try to create them from scratch.
Even though I have experience in Adobe Fuse and Mixamo to create characters with compelling animations, I stumbled upon so many challenges:
Adobe Fuse’s aesthetics is too modern for our project. I could only find one such costume online. Even then, this costume proved difficult to work with down along the line.
First, the original costume file (.obj) froze up Adobe Fuse because it contains too many faces (more than 20,000). I had to resize the file in Blender to a roughly a third of the original size so that it could be imported into Fuse:
Even then, when importing the costume into Fuse, something weird happened:
The costume doesn’t cover the character’s body completely no matter how hard I tried to reconfigured the body’s size. It seemed that there was something wrong with either the original file or with the resizing process. Not to give up, I tried remodeling the costume file in Blender……which proved to be working. However, I had to go back and forth between Blender and Fuse multiple times because there were no way to see how the costume fit into the character’s body.After many iterations, I finally got something that looked acceptable!This will be the daughter character. Below are some other women characters:
For now, I think I am done with women characters. The next step is to find suitable Medieval male clothes and create some men characters. After that, I will be able to plug the characters into Mixamo to animate them and bring them into Unity.
[Updated] May 3, 2020
After modeling the characters in Fuse and animating them in Mixamo, I imported the character into Unity. The import process, however, was far from straight-forward. I had to tweak around with the material’s different rendering process to pull out the most accurate depiction of the character. Here is a before-and-after example for the eyelashes.An overview of all the NPCs (of course, they would be scattered across the scene later on)An overview of NPCs’ animations. Most NPCs have two different animations: a default animation that plays from the scene’s beginning and a secondary animation that is triggered if the player comes closer to them (within a radius of let say, 20). The idea of such “interaction” is to free the player from having to concentrate on gazing or clicking on the NPCs; rather, the environmental storytelling told by the NPCs naturally unfolds as the player walks across and explores the city
[Updated] May 8, 2020
This is the place where the daughter will be hiding. I put some fences around so as to guide the player to approach the daughter at a right angle. I will add sound cues to suggest that the daughter is behind the fence when the player approaches this point in the game (the sound of the daughter crying / shouting for help). The daughter starts waving at the player as soon as the player comes to the other side of the fence, i.e. closer to the daughter. The daughter will also shout out “Mom…mom… come closer” to suggest the user coming even closer to her while she waves. As soon as such interaction is achieved, the daughter will “stick” to and move along with the player for the rest of the game. I also added a script that makes the daughter face towards the player when she waves.
[Updated] May 11, 2020
We received some feedback during the play-test session regarding introduction to the scene, i.e. setting up and giving the audience some backgrounds on the city and what is going on. We decided to make use of a flyby camera to show the entire city from above while narrating the city as a way to open the scene. While the implementation of another camera in the scene was easily achievable, we encountered some problems integrating it to the existing scripts that are using the other First Person character controller and camera, which have all been resolved.
“Octavia, the spider-web city, is nested between the slopes of two steep slopes, suspended by ropes, chains and bridges. Suspended over the abyss, the life of Octavia’s inhabitants is less uncertain than in other cities. They know the net will last only so long. The fateful day has come, the bridges are breaking and the ropes snap, leaving the inhabitants to face their city’s terrible doom. Find your daughter, the one thing you value in the city, and flee to the slope on the opposite side to safety… ” I used a black image on top of the canvas to implement the fading effect when changing scene by changing its opacityThis is the code for the camera flyby. Originally, we kept track of the z position of the camera to determine when to terminate the flyby and change to the first person controller. However, this proved to be unreliable as sometimes it would reach the pre-determined z position too soon and terminate before the narrative stopped (because of the inconsistent Update calls). Thus, I did some research and use Time.deltaTime to keep track of the real time in seconds, thus syncing with the narrative and the speed at which the flyby camera moves.